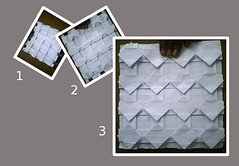
Ha! There goes my triumph of victory. As I told you earlier, this is the waterbomb tessellation I was talking about.
As you see, this is the continuation of my previous post.(That's why the pics are numbered 4,5 and not 1,2).
Tuesday, March 31, 2009

Sunday, March 29, 2009
Square tess
This is my first attempt at tessellating the waterbombs as referred in my earlier post. I've reached till the base of water bomb though. The paper refused to be folded any more. So I had to quit it here and was forced to make a larger model instead. More of it coming soon.
Water bomb Molecule..!!!
As I've done the catenation of the water bomb earlier(refer earlier posts),
I wanted to give it another dimension and make it a tessellation. So one afternoon, I've had fierce battle with a square of paper and after about 3hrs, I won!! I finally made the unit for the water bomb tessellation as you see here. I'll be soon tessellating it... So wait for it guys!!

I wanted to give it another dimension and make it a tessellation. So one afternoon, I've had fierce battle with a square of paper and after about 3hrs, I won!! I finally made the unit for the water bomb tessellation as you see here. I'll be soon tessellating it... So wait for it guys!!
Spring-diagram
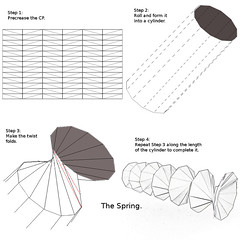
I've started Diagramming for some of the Items I've made and here's number one for you. To make the Spring as in the figure:
Step1:
First take the print out of the Crease pattern given there and fold along all the lines. Black for valley folds and blue for the mountain folds.
Step2:
Roll it up as shown so as to form a cylinder like structure, and over lap one of the edges there.
Step3:
If you've done the creases right, this step will be not-so-difficult. If you have any doubt about your creases, I strongly suggest you redo your creases.
Once you've done your creases, and hold it up as in step 2, you should see that the top tends to twist in clockwise(it's not wrong if yours is anti-clock though). So twist it while flattening it gradually. Now you have something similar to the figure in step 3.
Step4:
Now all you've got to do is repeat the step3 along the length of the cylinder and have the spring shaped up in your hands.
Good luck!!
Catenated waterbombs...
Hello folks!!
The one here, that's looks kinda like a bangle or a necklace or watever is a chain of water bombs... It's an entry I made for an online origami contest titled "Octagons for October." That's why there are 8 bombs there. Since it can be extended only in one direction, I call it a catenation rather than a tessellation.

The one here, that's looks kinda like a bangle or a necklace or watever is a chain of water bombs... It's an entry I made for an online origami contest titled "Octagons for October." That's why there are 8 bombs there. Since it can be extended only in one direction, I call it a catenation rather than a tessellation.
Saturday, March 28, 2009
2 Cube...
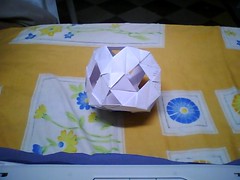
This too has been made from the same module I used for the earlier Truncated cube( in my earlier post)
It took 48 modules and about 2 hours of non-stop-fun to make this. This was relatively easier than the truncated cube as the joints are a bit stronger and hold easily.
The same idea can be extended to make even larger cubes too(if you find a paper strong enough ;)... and adding bit of math the number of modules is given by the formula
n=24+12*(s-2)+12*s*(s-1).
which gives 12,for cube with one side and 48 for side of 2 modules.
Truncated cube!!!
This figure takes the form of a cube with its vertices cut-off, so that the face after cutting forms an equilateral triangle.
What's more..?? This has been made from same module as I made the modular cube.
A cube and a truncated cube from the same module make feel excited about what more interesting figures I can make out of the module. I'll soon upload a colored version of it and the diagram to make the module for enthusiasts.
Made from print paper, 24 modules. It's been really a pain to put the pieces together as they tend to curve in oppsite directions *and* the bonds are not as strong as they were in the cube.
It is now resting on one of its triangular faces.
Getting bored in a movie theatre!!
Have you ever got bored in a cinema?? Well, I was once and didn't know what to do. I heard from someone that answer to all your questions are always in your hand and guess what? I'm holding an empty Pop corn container there and tried to do something in the darkness. It's not until I came out of the hall that I found out what I had done.
The way the folding ended at the trash icon; a strange coincidence that is...

The way the folding ended at the trash icon; a strange coincidence that is...
Friday, March 27, 2009
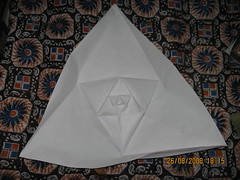
Logarithmic Triangles - Reverse.
I was actually trying to make a series of triangles with a twist so they look like they're spiraling from the center. However, the due to some numerical confusion, the angle of the spiral came out to be 60 degrees and now it looks like equilateral triangles one inside another. Either way, it's good enough for me ;)
The CollapTable...
Wanna have a writing desk that goes under your bed when you're not using it?
How about a coffee table that you can fold away?
Then meet The CollapTable. Inspired by the geometric exploration in origami, It's your solution for style, space and comfort. It can be collapsed into just a plane sheet of wood that can fit in small spaces like that under a bed.

How about a coffee table that you can fold away?
Then meet The CollapTable. Inspired by the geometric exploration in origami, It's your solution for style, space and comfort. It can be collapsed into just a plane sheet of wood that can fit in small spaces like that under a bed.
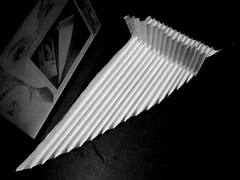
Playing with Corrugations!!
What do you think of infinity?
You might ask how is that related to this blog??
OK, I'll answer it. Look at the pic closely- Get it?? That's right. This is a picture of a picture of a picture of .... to infinity.
So now coming to the origami part of the pic, this is called a corrugation-A series of alternate folds. I didn't have anything in my mind to make and let my fingers wander and trample the paper until I ran into this.
Subscribe to:
Posts (Atom)
