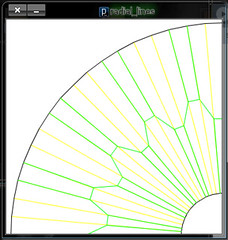
The CP for my radial corrugation.
This has been rendered using the open source "Processing". I came across it just last night and found it really helpful.
This below is the source code for it:
float r,x1,x2,y1,y2,x3,y3,a=0.55,b=0.65;
int i;
float theta,theta1;
void setup(){
size(350,350);
smooth();
r=340.0f;
}
void draw() {
background(255);
translate(width,height);
for(i=0;i<72;i++) {
theta=i*2*3.14/72;
theta1=(i+1)*6.28/72;
x2=r*sin(theta);
y2=r*cos(theta);
x3=r*sin(theta1);
y3=r*cos(theta1);
x1=x2*0.2;
y1=y2*0.2;
stroke(#ffff00);
line(x1,y1,x2,y2);
stroke(0);
line(x1,y1,0.2*x3,0.2*y3);
line(x2,y2,x3,y3);
if(i%4==1) {
stroke(#00ff00);
line(a*x2,a*y2,b*x3,b*y3);
line(x1,y1,a*x2,a*y2);
}
if(i%4==2) {
stroke(#00ff00);
line(b*x2,b*y2,b*x3,b*y3);
line(b*x2,b*y2,x2,y2);
}
if(i%4==3) {
stroke(#00ff00);
line(b*x2,b*y2,a*x3,a*y3);
line(b*x2,b*y2,x2,y2);
}
if(i%4==0) {
stroke(#00ff00);
line(a*x2,a*y2,a*x3,a*y3);
line(x1,y1,a*x2,a*y2);
}
}
}
Thursday, April 23, 2009
Tuesday, April 14, 2009
Hybrid
This is a hybrid of The spring and the corrugation I made recently. I'm not satisfied with the finish though. I'll have to work out a better one again sometime.
Precrease
I don't remember what I've done with this pre-crease, jus found this pic in my comp. This one of the most accurate pre-creasing I've ever done.

Circus Tent
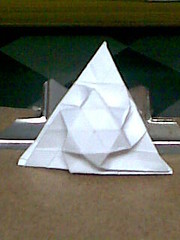
One more experiment with the corrugation. Except that this time the creases actually reached the center (which tore the paper apart). I might wanna try it again with a better paper.

Sunday, April 12, 2009
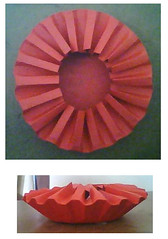
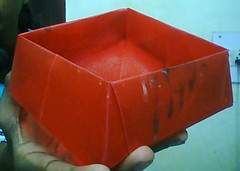
Ash Tray
A modified form of the Sequel to the Radial Corrugation.
Now it's an Ash tray.
This is kinda satisfying after what happened previously.
Now it's an Ash tray.
This is kinda satisfying after what happened previously.
The Sequel to the radial corrugation
This was a very disappointing outcome. I've thought it'd be more dramatic than the previous one. However, this can be considered an improvement in the sense that the central part needn't be cut as in the earlier one.
This had been a real painful experience. It was a 36 sided regular polygon in the inside and 72 sided one on the outside(same as the previous one). I had to redraw the entire crease pattern on the paper due to a "little" calculation mistake and I was on the verge of giving up. It was Then I took time to let off the steam and redid the CP again. Now I got it right.

This had been a real painful experience. It was a 36 sided regular polygon in the inside and 72 sided one on the outside(same as the previous one). I had to redraw the entire crease pattern on the paper due to a "little" calculation mistake and I was on the verge of giving up. It was Then I took time to let off the steam and redid the CP again. Now I got it right.
The Sequel to the radial corrugation
This was a very disappointing outcome. I've thought it'd be more dramatic than the previous one. However, this can be considered an improvement in the sense that the central part needn't be cut as in the earlier one.
This had been a real painful experience. It was a 36 sided regular polygon in the inside and 72 sided one on the outside(same as the previous one). I had to redraw the entire crease pattern on the paper due to a "little" calculation mistake and I was on the verge of giving up. It was Then I took time to let off the steam and redid the CP again. Now I got it right.
This had been a real painful experience. It was a 36 sided regular polygon in the inside and 72 sided one on the outside(same as the previous one). I had to redraw the entire crease pattern on the paper due to a "little" calculation mistake and I was on the verge of giving up. It was Then I took time to let off the steam and redid the CP again. Now I got it right.
Saturday, April 11, 2009
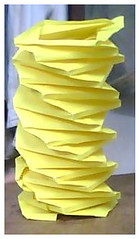
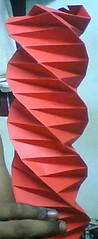
Experiment with the Corrugation
Yesterday, I was playing around with the Corrugation and tested its freedom to bend and curve. It was then it struck me to apply the same pleating method radially. Applied it and here's the result :D Also, it can collapse till the central hole vanishes completely. But the paper was so hard(220GSM) that it wouldn't stay closed by itself. Started from a circle 30cm in dia and had a circle of 10cm dia cut out.
This is my first experiment with the "Corrugation" and had to cut the central part out to make it work. However, I've figured a way around it.
Watch the video of it in action here: http://www.youtube.com/watch?v=4LFRu_E6Llo
There's more of it coming though...

This is my first experiment with the "Corrugation" and had to cut the central part out to make it work. However, I've figured a way around it.
Watch the video of it in action here: http://www.youtube.com/watch?v=4LFRu_E6Llo
There's more of it coming though...
Tuesday, April 7, 2009
Corrugation
I don't know what to call it. Simple corrugation. I know I've seen someone else do a similar thing but am unable remember where...

Framed.
These are the my first tessellations that happened to get into the frames- Thanks to Endre Somos who provided me with the frames...

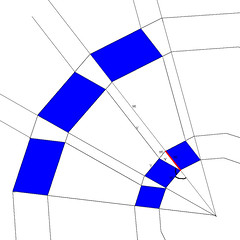
Instructions for flower tower
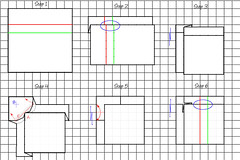
To view the image annotated with important points and markers, go to the photo page by clicking on the image.(Or here's the link
Instructions for folding the flower tower
>Start by floding the paper into 16ths, radially.
>Fix the size of the smallest polygon.
>Then fix the length of the RED line as in the pic.(It is arbitrary.) The length is measured along the radius.
>Now construct the parallelograms i.e the blue regions in the figure.
>Note that angle A and Angle B are congruent.(see notes)
>Now repeat the process over the entire polygon to construct the first iteration of the CP.
>Now fold the first iteration.Mountain and Valley folds are marked with M and V respectively.
>Note that the secondary radial lines tend to get away from their corresponding radii as the iterations progress.
>Similarly, for the second Iteration, start with a comfortable distance from the center.
>Construct the parallelograms as shown-Their reference lines can be obtained the line from the "vertex" (note). The side of the parallelogram that lies on the radius can be of arbitrary length.
>The inner most polygon doesn't have any folds and stays flat after the model is complete.
>Repeat the iterations till either your patience or the paper runs out.
The same procedure can be applied to polygons with any number of sides. All the above math is still applicable i.e the lines being parallel and the angles equal.
Spring
For the first time I've made some progress in making this kind of spring. My pre-creasing was bad and this doesn't collapse at all. So I'm gonna have to try this again I suppose.
Variant 1 of the modular tessellation!
This is the first variant of the Modular tessellation I made earlier. I've used a set of black squares too this time so it adds a pleasing effect to the tess. This is what I call the Front side of the tess.
Here's the link to the other side.

Here's the link to the other side.
Side 1 of The Palindromic Tess!!
Since I've started playing with the Hex grid recently, I thought of applying to hex grid, what I did to the square grid.
This is what I've been trying to do and just got stuck here. I'm here lost and confused.
I have no Idea how to proceed coz everywhere I start a new triangle, I either end up in the wrong place or removing other correct triangle. I know I can continue this further but I utterly bewildered now.
This is what I've been trying to do and just got stuck here. I'm here lost and confused.
I have no Idea how to proceed coz everywhere I start a new triangle, I either end up in the wrong place or removing other correct triangle. I know I can continue this further but I utterly bewildered now.
Modular Tessellation
I was wondering if I could make any plane modulars, to cover my laptop's keyboard when idle and also good enough to show off my skills in folding. Now I've got a lot more than I expected. It is too good to just be used as a cover. Diagrams and some modifications coming soon...
Spoiler warning:
For those who can't wait, this is the piece I've used as a module. It should be easy to figure out now.
Spoiler warning:
For those who can't wait, this is the piece I've used as a module. It should be easy to figure out now.
A tee for Origami Wizards!!
A tee I bought for my last B'day!!
Somehow I missed uploading it that time. And trust me, it's NOT a custom made order or something. I just happened to find it in a store.
This is the front of it and back is plain.
The illustration is a diagram for making what I think, is a Seagull. Not sure though.

Somehow I missed uploading it that time. And trust me, it's NOT a custom made order or something. I just happened to find it in a store.
This is the front of it and back is plain.
The illustration is a diagram for making what I think, is a Seagull. Not sure though.
Hexagonal Spread Tess
My recent attempts with the hexagonal grids led me here. I sure had fun playing in a new field, i.e. the Hex grid, which I rarely set my fingers upon.
I've been unable to stop grinning since I completed the first iteration and after it was complete, I was totally excited to do more!!

I've been unable to stop grinning since I completed the first iteration and after it was complete, I was totally excited to do more!!
The Bowl...
This is the bowl I used for washing brushes while I was painting. I didn't find any suitable containers all of a sudden (it was 1am when I started painting) and the plastic sheet caught my eye. Couldn't help but fold!! As someone else said before,"If you can't find something, then make it yourself."
My experiment with Hex grid
Long ago, I tried Hex grids and found out that it needs a lot more patience and time to work on a hex grid. So I kept myself to the square grid. For a change, I tried Hex grid recently and this is what it turned out to be. Just a hex twist, with a bulge.
Started from a 10cm square paper.
Started from a 10cm square paper.
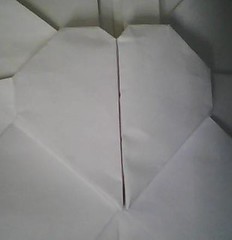
Embossed heart
This too was made for the valentine's day. Could make it with a better proportions but was in a hurry. Anyway, I'm gonna have a second go at it later...
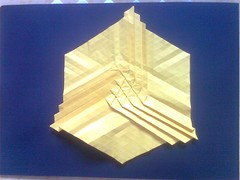
Flower Tower
This is my first try with this. It's not as neat as it looks here. I was inspired by this from Jeff Rutzky.
Started from a square 40com across, printer paper.
Correct me if I'm wrong:I've figured that the above pattern is also a corrugation only after I folded this. Second degree radial corrugation if you may call it.

Started from a square 40com across, printer paper.
Correct me if I'm wrong:I've figured that the above pattern is also a corrugation only after I folded this. Second degree radial corrugation if you may call it.
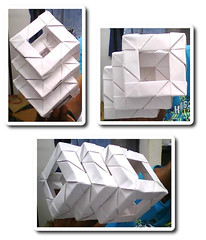
Interlocked cubes!!
One of my old models, now interlocked. This is the most closely packed form of this cube and no more cubes can be added. I wished I could make a sturdy long structure.
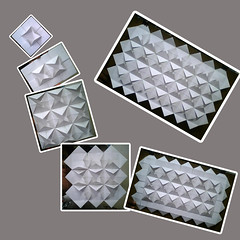
Tessellated Hearts!!
Love for tessellations or Tessellations for love or simply put, a mixture of
craziness and boredom.
I wanted this to be a Valentine's day special. However, I felt so bored
that I couldn't help but folding it.
This is a very densely packed model. Started with 30cm square and ended with
12cm tessellation.

craziness and boredom.
I wanted this to be a Valentine's day special. However, I felt so bored
that I couldn't help but folding it.
This is a very densely packed model. Started with 30cm square and ended with
12cm tessellation.
Allinone
Here's how to make a Fish scale tess.
Step 1:
Start with an 8x8 grid(or higher if you have enough patience.
Step 2,Step 3:
Fold as the figure illsutrates.
Step 4:
This is a bit difficult compared to others.
Open up every thing and let the point A meet the point B.
Step 5:
Collapse it and let it lay flat. This is how your paper should look like now.
Fold the top flap along the valley line indicated.
Step 6:
There! You've completed one scale!
Now repeat the process on the rest of the paper.
(Notice the similarity of the circled portions in Step 2 and Step 6.)
Red for valley fold and
green for mountain folds.
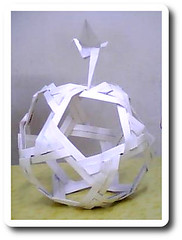
Solitary world!!
A modular icosahedron I think- I'm not so familiar with the names...
The polyhedron, by itself didn't seem complete to me. Just thought it needed some life and there it is, a little crane fishing alone on planet origami...!!
The polyhedron: Designed by Wilson Chan and folded by me
The polyhedron, by itself didn't seem complete to me. Just thought it needed some life and there it is, a little crane fishing alone on planet origami...!!
The polyhedron: Designed by Wilson Chan and folded by me
Merry X'mas!!
Say merry X'mas, the Origami way!!
A corrugated Christmas tree, propped on a card.
I should've done it with a dark green paper instead, but didn't find one handy all of a sudden...
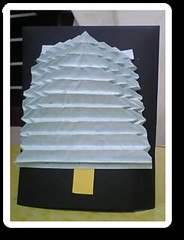
A corrugated Christmas tree, propped on a card.
I should've done it with a dark green paper instead, but didn't find one handy all of a sudden...
Cigarette Pack!!
It's been a long time I made this one. Somehow missed to upload it.
I made it to hold a deck of cards rather than cigarettes. But now it looks more like a cigarette pack than that of cards. I did consume a hell lot of paper resulting in a very sturdy frame. I took me an hour to design and fold it.

I made it to hold a deck of cards rather than cigarettes. But now it looks more like a cigarette pack than that of cards. I did consume a hell lot of paper resulting in a very sturdy frame. I took me an hour to design and fold it.
Roll of water bombs....
When I made the catenated waterbombs, I wanted to make longer chain of water bombs to play with. So got a roll of paper right then and started 'weaving' it...

Thursday, April 2, 2009
Front and Back.
I'd like to ask you a question. How do you define the front and back of a tessellation??? Or in particular, in this picture?? It shows the two sides of a pattern I made recently. Try figuring out what is front and what is the back for it.(click on the pic to see it enlarged)
Never did I think I'd come across something "I" made and be unable to decide what is front and what is the back.
I leave it to you to figure it out guys...

Never did I think I'd come across something "I" made and be unable to decide what is front and what is the back.
I leave it to you to figure it out guys...
Subscribe to:
Posts (Atom)
